Microstar K7T Pro Socket-A KT133 ATX
by Mike Andrawes on July 23, 2000 11:58 PM EST- Posted in
- Motherboards
The VIA 686A Super South Bridge helps reduce costs by integrating a number of features into a single chip. The VIA 686A actually adds a number of features, including support for 4 USB ports, integrated hardware monitoring, and an AMR interface. Two of those USB ports are available via the standard ATX I/O panel, while the other two are only available with a cable that can run to the front or back of your case. Kudos to Microstar for included this cable so that all USB ports are usable out of the box. A VIA VT1611A AC97 CODEC provides host-based audio support, but anyone that cares about their PC's sound will want to disable the onboard sound in favor of a true hardware-based solution.
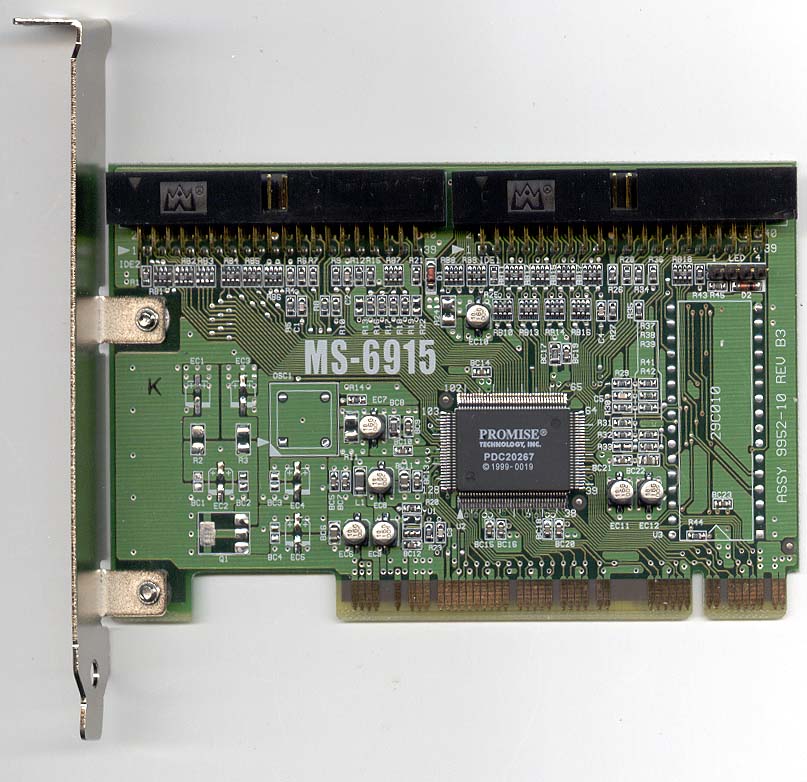
While the 686A already offers integrated Ultra ATA/66 support, our board was actually bundled with the MS-6915 Ultra ATA/100 controller card, based on the Promise PDC20265/PDC20267 chip. We're not sure what the difference is between these two Promise chips, but our 6915 was equipped with the PDC20265 for that that are curious. This card is identical to the Promise Ultra100 Ultra ATA/100 controller, but without the BIOS chip. That means you need to use it in a motherboard with the Ultra100 BIOS integrated with the motherboard BIOS, limiting you to MSI boards for now. We don't expect the 6915 to be bundled with every K7T Pro, but it probably will be relatively inexpensive compared to the "real" Ultra100 from Promise, especially when bundled with the board.
Later this year, VIA will be introducing the 686B South Bridge, which will add Ultra ATA/100 support to everything the 686A has to offer in a pin compatible package. More than likely, Microstar will simply drop in the 686B to add Ultra ATA/100 support to the K7T Pro, but it will be at least a few months before that happens.
The typical Microstar manual ships with the K7T Pro, which means that it lacks details on installing a motherboard, but is otherwise pretty good for the experienced user, and includes information on all connector pin outs as well as the various BIOS settings. If you do have any diagnostic problems, MSI's onboard D-LED feature will help, which is now mounted between the serial/parallet ports and the game/sound ports, facing the inside of the computer. As the system boots, you'll notice the LED's blink green and red in a variety of patterns as different components are initialized. If everything is successful, all LED's will finally illuminate green. If a problem occurs, the pattern on the LED's can be used to help troubleshoot. A convenient sticker, which should be placed inside the computer, is included in the box that lists all possible problems that can be displayed by D-LED.


0 Comments
View All Comments