Original Link: https://www.anandtech.com/show/11284/msi-asrock-z270-sli-140-bucks
Kaby Lake Motherboards at $140: MSI Z270 SLI Plus vs. ASRock Z270 Killer SLI
by E. Fylladitakis on May 1, 2017 10:30 AM EST- Posted in
- Intel
- MSI
- ASRock
- Motherboards
- SLI
- Kaby Lake
- Z270
- Z270 SLI PLUS
- Z270 Killer SLI
Earlier this year, Intel released their latest Kaby Lake processors and the new Z270/H270 chipsets to accompany them. Myriads of motherboards based on these two chipsets have been released during these past couple of months, covering virtually all of the consumer market demand.
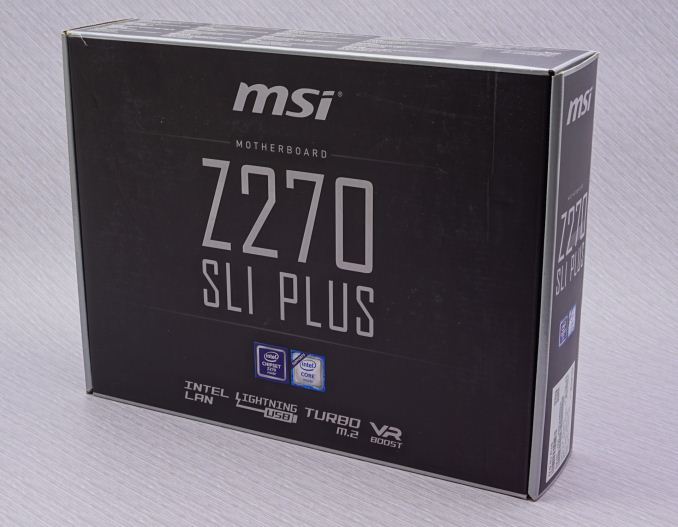
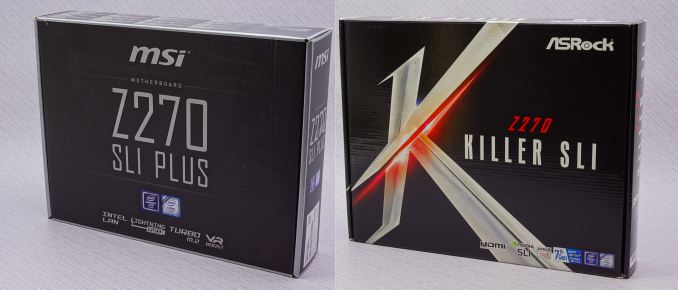
In this review, we are having a look at two cost-effective Z270 motherboards that have been designed with gamers in mind - the MSI Z270 SLI Plus and the ASRock Z270 Killer SLI. As their names suggest, these two motherboards mainly place their marketing focus on the SLI support, and both have a retail price of under $140. We will examine their features, differences and performance in the following pages of this review.
Other AnandTech Reviews for Intel’s 7th Generation CPUs and 200-Series Motherboards
The Intel Core i7-7700K (91W) Review - CPU Review
The Intel Core i5-7600K (91W) Review - CPU Review
The Intel Core i3-7350K (60W) Review - CPU Review
CPU Buyer's Guide: Q1 2017 - Guide
In comparison to the older Z170 boards, the new Z270 board on the base specifications are hardly any different. The Z270 ones have four extra PCIe lanes configurable on the chipset, potentially new audio and new networking controllers, and Intel Optane Technology Support. Although four extra PCIe lanes does sound like a huge difference, it is an important upgrade for the implementation of native M.2 slots (on Z170-based motherboards, this usually meant disabling some other device/port on the motherboard). Also, note that Intel Optane drives should still function on other chipsets as drives; the Z270 only allows them to enable their “smart caching” technology.
The Intel Optane Memory (SSD) Preview: 32GB of Kaby Lake Caching
Individual motherboard manufacturers will be sprinkling on new features onto their Z270 products to aid the transition and provide other tangible benefits over the old platform.
To read specifically about the Z170 chip/platform and the specifications therein, our deep dive into what it is can be found at this link.
MSI Z270 SLI Plus Overview
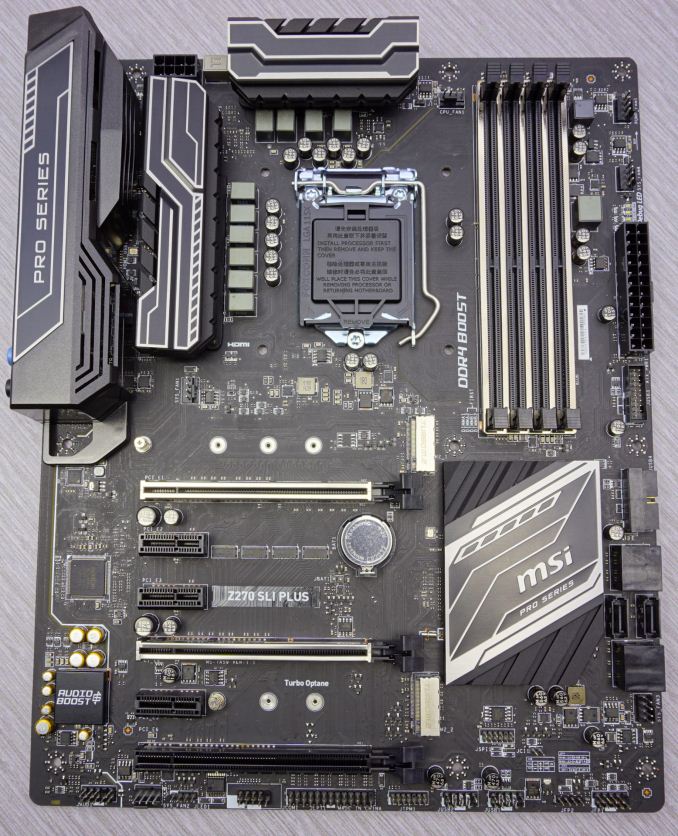
The MSI Z270 SLI Plus is a motherboard trying to implement as many practical features as possible while keeping the price tag below $140. It has two M.2 PCIe 3.0 x4 slots, with one of them supporting M.2 devices up to 110 mm long, and a total of six SATA 6Gb/s connectors. There are no native U.2 connectors but U.2 drives can be connected to the M.2 slots by using appropriate adapters. The new Z270 chipset allows the two M.2 ports to operate PCIe devices without disabling anything on the motherboard, but the use of SATA M.2 drives will disable one SATA port for each drive. MSI also implemented the new Realtek ALC1220 audio codec, as well as the competitive Intel I219-V Gigabit LAN chipset. A TPM header is also present.
The number and type of USB ports on the MSI Z270 SLI Plus can be a little confusing. The motherboard’s specifications state that the motherboard has one USB 3.1 Type C port and five USB 3.1 Type-A ports on the back panel, plus four USB 3.1 and four USB 2.0 Type-A ports available via headers. Once you read the specifications more carefully, it becomes apparent that the unnaturally high number of USB 3.1 ports is due to MSI dubbing the USB 3.0 ports as “USB 3.1 Gen 1”, while the 10Mbps ports are the “Gen 2”. They have an article posted on why they do so. So, technically, the motherboard has two USB 3.1 ports (one Type-A and one Type-C) that are being provided by the ASMedia ASM2142 controller, while the rest are USB 3.0 ports that are being provided by the Intel Z270 chipset.
ASRock Z270 Killer SLI Overview
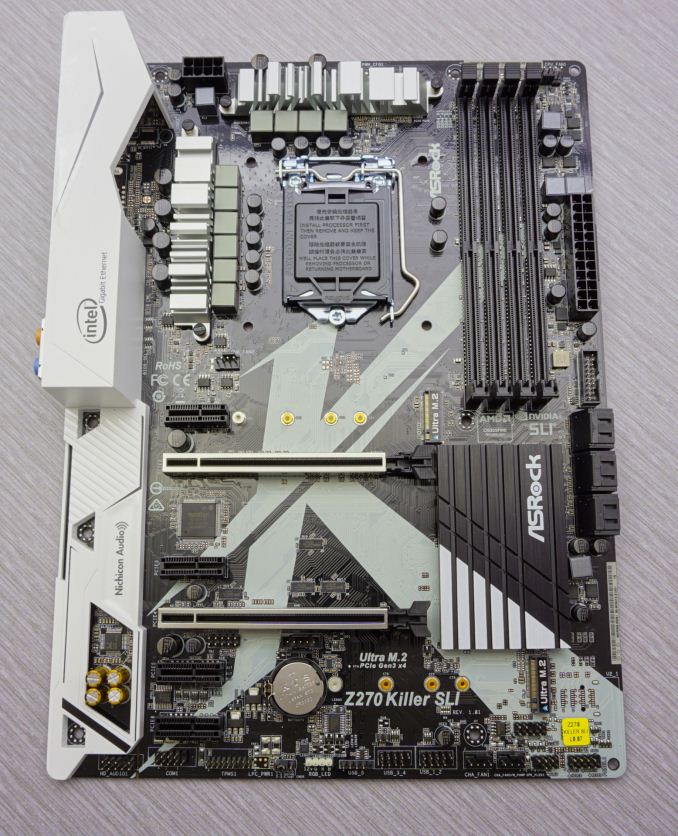
Even though the retail price of the two motherboards is very similar, ASRock’s approach is significantly different than that of MSI’s. The ASRock Z270 Killer SLI is a motherboard trying to combine features with aesthetics. It features RGB lighting (chipset heatsink, plus a header for RGB LED strips) and has a painted PCB to identify with the Killer brand. It is almost identical to SLI’s offering in terms of drive support, featuring two M.2 PCIe 3.0 x4 slots with one of them supporting M.2 and a total of six SATA 6Gb/s connectors. The only difference here is that both M.2 slots support devices only up to 80 mm long. Similar to the MSI, both of the main PCIe slots from the CPU come with integrated slot guards to reduce any potential bending or warping from heavy graphics cards.
ASRock also went with the highly popular Intel I219-V Gigabit LAN chipset. To contrast, the audio chipset is the now aged Realtek ALC892, which is a mediocre choice for a gaming motherboard. The motherboard also has no support for USB 3.1 (10 Gbps) devices at all. The ASRock Z270 Killer SLI has one Type-C connector and five Type-A connectors, all of which are USB 3.0 (5 Gbps) compliant. Headers for two extra USB 3.0 connectors and up to five USB 2.0 connectors are available. There is also a header for Thunderbolt AIC connectors (5-pin or 10-pin), which cannot be found on the MSI Z270 SLI Plus.
| Motherboard Comparison | ||
| MSI Z270 SLI Plus | ||
| Socket | LGA1151 | LGA1151 |
| MSRP at Review | $133 | $143 |
| DRAM | 4 x DDR4 | 4 x DDR4 |
| PCIe Layout | x8/x8 | x8/x8 |
| BIOS Version Tested | 1.4 | 2.0 |
| MCT Enabled Automatically? | Yes | Yes |
| USB 3.1 (10 Gbps) | ASMedia ASM2142/Intel Z270 | None |
| M.2 Slots | 2 x PCIe 3.0 x4 | 2 x PCIe 3.0 x4 |
| U.2 Ports | No | No |
| Network Controller | 1 x Intel I219-V | 1 x Intel I219-V |
| Audio Controller | Realtek ALC1220 | Realtek ALC898 |
| HDMI 2.0 | No | No |
MSI Z270 SLI Plus Board Features
As we mention in our introductory section, MSI’s designers have been trying to implement on the Z270 SLI Plus as many practical features as possible with a motherboard that needs to retail for under $140. Compromises had to be made and thus there is no Thunderbolt support and no native U.2 ports - adding these would have pushed the cost higher and into a more premium category. The use of U.2 drives is still possible though, with appropriate adapters on the M.2 slots.
| MSI Z270 SLI Plus | |
| Warranty Period | 3 Years |
| Product Page | Link |
| Price | $133 |
| Size | ATX |
| CPU Interface | LGA1151 |
| Chipset | Intel Z270 |
| Memory Slots (DDR4) | Four DDR4 Supporting 64GB Dual Channel Up to 4133 MHz |
| Memory Slots (DDR3L) | None |
| Video Outputs | HDMI 1.4 DVI-D |
| Network Connectivity | Intel I219-V |
| Onboard Audio | Realtek ALC1220 |
| PCIe Slots for Graphics (from CPU) | 2 x PCIe 3.0 (x16/x0, x8/x8) |
| PCIe Slots for Other (from PCH) | 1 x PCIe 3.0 x4 3 x PCIe 3.0 x1 |
| Onboard SATA | Six, RAID 0/1/5/10 |
| Onboard SATA Express | None |
| Onboard M.2 | 2x PCIe 3.0 x4 or SATA, RAID 0/1, NVMe |
| Onboard U.2 | None |
| USB 3.1 | 1 x Type-A on back panel, ASMedia ASM2142 1 x Type-C on back panel, ASMedia ASM2142 |
| USB 3.0 | 4 x Rear Panel 4 via headers |
| USB 2.0 | 2 x Rear Panel 4 via headers |
| Power Connectors | 1 x 24-pin ATX 1 x 8-pin CPU |
| Fan Headers | 1 x CPU (4-pin) 1 x Pump (4-pin) 4 x CHA/SYS (4-pin) |
| IO Panel | 1 x Combination PS/2 2 x USB 2.0 4 x USB 3.0 (USB 3.1 Gen 1) 1 x USB 3.1 Type-A 1 x USB 3.1 Type-C 1 x Network RJ-45 HDMI 1.4 DVI-D Audio Jacks |
| Other Features | COM/Parallel Port Header TPM Header Front Audio Header RGB LED Connector |
Using the Realtek ALC1220 will be a plus here, especially in comparison to the ASRock. When going cheap on a board, some vendors choose Realtek for network controllers, but most motherboard manufacturers now see added value in choosing the Intel chipset. It is worth noting that there is also no optical SPDIF out jack, which can be quite the issue for people using sound devices that rely on such a connector.
In The Box
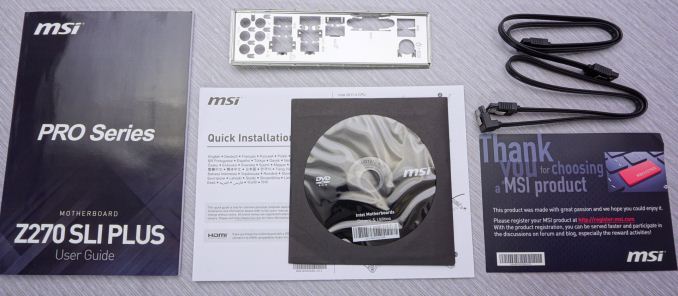
We get the following:
Driver Disk
Manual
Rear I/O Shield
Two black SATA cables (one straight, one with a 90° connector)
The bundle of the MSI Z270 SLI Plus is frugal, with the company obviously trying to keep the retail price of the motherboard below $140 without sacrificing any of its features. There is a single, detailed user’s manual that is printed only in English, a DVD with the drivers and other software, a typical I/O shield, a basic quick installation leaflet, a registration card and, finally, just two black SATA cables. We did not find as much as a case badge included, let alone front panel attachments and/or Type-C cables, or other “premium” items. Considering the retail price and listed features of the motherboard, we were not surprised that MSI had to stick with the absolute basics here.
Visual Inspection
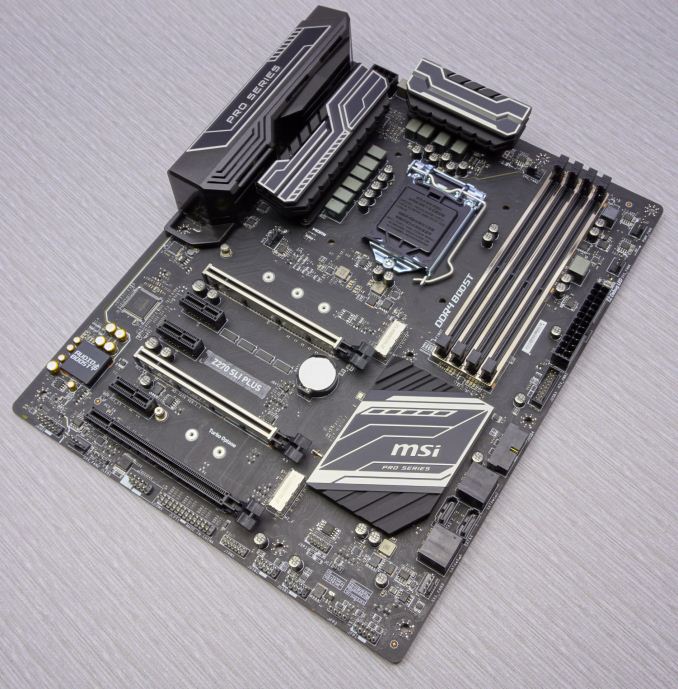
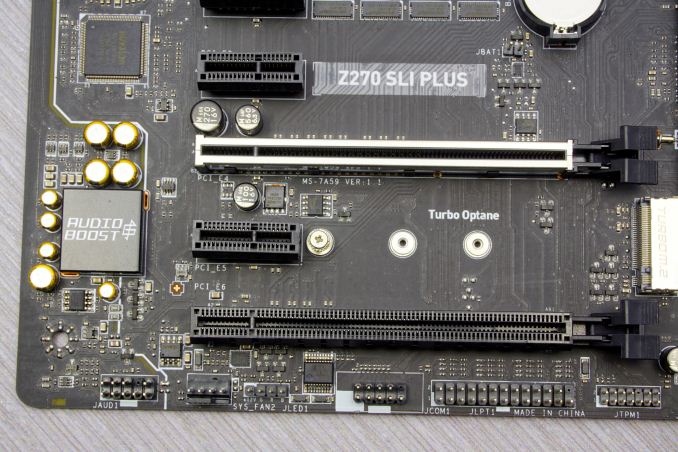
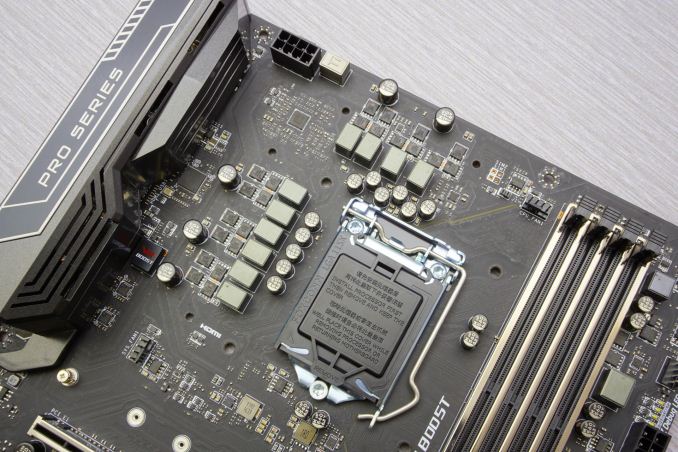
The company’s designing efforts were mostly focused on making the Z270 SLI Plus a functional board but they did not neglect aesthetics while at it. The Z270 SLI Plus is an all-black board, with black heatsinks that feature silver trim designs. White LEDs have been installed at the back of the motherboard, illuminating the system area surrounding it. There is a header for RGB strips that the company dubs the “Mystic Light”, which are controllable via the provided software, but the user will always be stuck with white lighting on the motherboard itself. Nevertheless, the onboard LEDs can be switched off if the user wants to. MSI also implemented "shielding" on the PCIe and DIMM slots, in the form of a metal brace. The metal brace assists in rigidity, preventing wrapping and damage due to excessive force, weight, or the combination of the two. It can be highly practical for users who transport their system or change cards/DIMMs often. MSI decided not to install such a shield on the third PCI-E 3.0 ×16 slot, quite possibly because the company does not expect a heavy, high performance GPU card to be installed there.
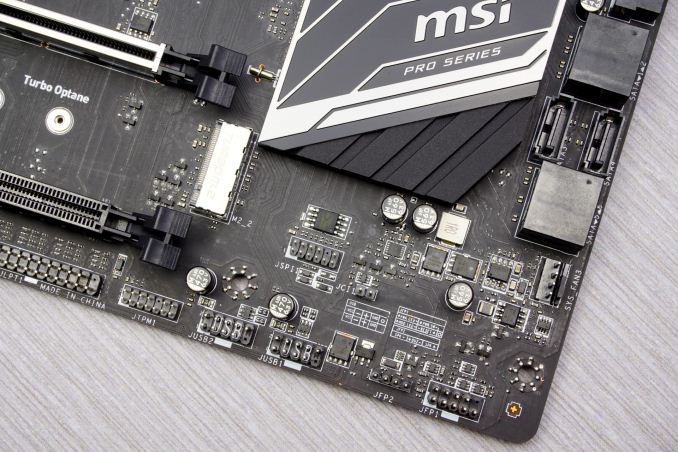
The general layout of the motherboard is simple, clean and functional, with the designer placing nearly all of the headers across the bottom edge of the motherboard. This includes a TPM and the RGB LED strip headers. Only the headers for the four USB 3.0 ports can be found next to the ATX power connector, which is reasonable considering that these will most likely be used by corresponding front panels that will be installed at the front of the case. There is no code display but MSI did implement a simple debug LED system that can be effectively used for troubleshooting.
The designer also expanded the space between the two primary PCI-E ×16 slots, allowing better cooling when up to two double-slot cards are installed. The M.2 drive slots have been placed above the first PCI-E ×16 slot and below the second PCI-E ×16 slot. Depending on the size and type of the CPU cooler, the top M.2 slot can be accessible when the system is fully assembled. If a second GPU is installed, it is highly unlikely that the bottom M.2 slot will be accessible without the card removed. The top M.2 slot supports devices up to 110 mm long (22110 type) but the bottom is limited to devices up to 80 mm long (2280 type). Six SATA ports can be seen grouped together next to the chipset heatsink. Two SATA ports face upwards, the other four are angled and face towards the right side of the motherboard.
There are five fan headers, plus an extra header for a pump. The CPU fan header is next to the CPU socket but the designer moved the pump header to the top right corner of the motherboard, after the DIMM slots. The four system fan headers are found next to the ATX power connector, to the middle left side of the motherboard above the M.2 slot, to the bottom left corner between other headers, and to the bottom right of the motherboard, just under the SATA ports.
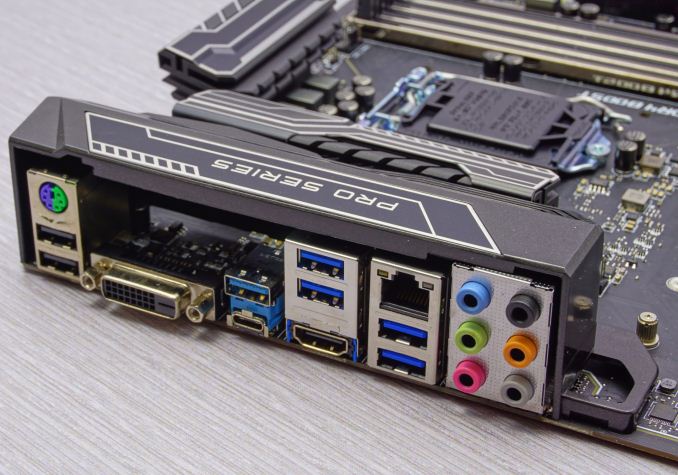
A look at the rear of the MSI Z270 SLI Plus reveals one significant shortcoming - despite the use of a good audio chipset, the motherboard has no optical SPDIF out port. This limits the compatibility of the motherboard in terms of sound significantly, virtually preventing it from digitally connecting to any audio device that depends on a digital connection, such as the majority of home cinema and living room audio systems.
There are two display ports, one DVI-D and one HDMI 1.4a. The HDMI port is limited to 30Hz @ 3840 × 2160 or 24Hz @ 4096 × 2160 but we do not consider that to be a real issue as the Intel HD Graphics GPUs that are found inside the Kaby Lake processors cannot be used for gaming at such resolutions. We feel that the practical purpose of having HDMI/DVI-D connectors on these motherboards is only to allow for the user to still have a usable system when the discrete GPU card(s) have been temporarily uninstalled, e.g. if damaged and being returned or between upgrades, or to drive a secondary monitor that will be used for simple tasks.
We can also see a PS/2 combo port, two USB 2.0 ports, one USB 3.1 Type-C and one USB 3.1 Type-A ports, four USB 3.0 ports (MSI dubs these as USB 3.1 Gen 1) and six 3.5 mm analog audio jacks.
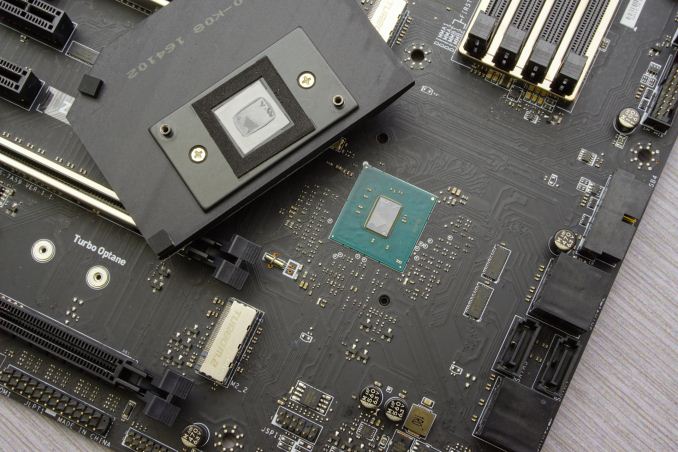
The chipset heatsink is making very strong contact with the chipset core, with the thermal pad very strongly adhered onto it. It was very difficult to remove the heatsink, to the point that we were afraid that the core got irreparably damaged once we forced it off the motherboard. Our sample’s chipset ultimately survived, but we advise extreme caution if for any reason the chipset heatsink has to be removed. In terms of cooling, we do not feel that anyone will actually have to remove the heatsink in order to upgrade it, as the Z270 chipset has low cooling requirements and the heatsink is exceptionally well seated onto it.
Identifying most of the passive components on the MSI Z270 SLI Plus is quite the challenge as the company has rebranded most of them. We have “Titanium chokes”, “Low ESR Dark Caps” and low temperature “Dark chokes”, all of which supposedly meet the “highest quality standards”, but we can only guess who the OEM behind these parts really is. We do not feel that there is a reason to be alarmed regarding their quality here, it is quite likely that a reputable Japanese OEM is behind the manufacturing of these parts.
The VRM circuit is a 10-phase design, with the phases distributed to the four different input voltages that the modern 1151 CPUs require (Core, I/O, Graphics and System). We could not identify the controllers as they had their markings erased but we can clearly see that Niko semiconductor MOSFETs are being used everywhere, including for the RAM modules. It overall appears to be a design reasonably good for serious CPU overlocking that will please any overclocker looking to build an everyday system.
BIOS
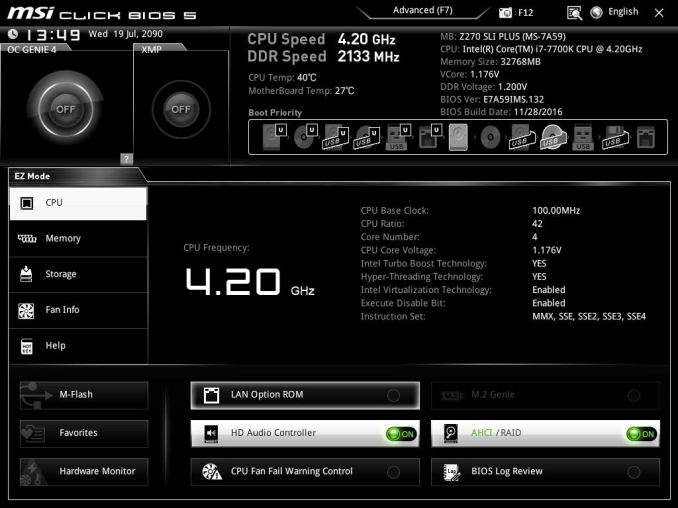
The MSI Z270 SLI Plus has a user-friendly graphical BIOS that MSI calls the “Click BIOS 5”. Its default “EZ Mode” reduces it down to a single screen that is offering only the most basic options and system monitoring. There are two large buttons for the automated “Genie” overclocking mode and for the enabling of the RAM XMP profiles, plus a few buttons at the bottom of the screen that can be used to switch on/off the LAN Option ROM, the HD Audio Codec, the M.2 Genie (RAID), the SATA ports between AHCI and RAID, and the CPU fan warning. The sixth button pops up a log screen that displays all of the changes that have been performed during this and previous BIOS sessions. The hardware monitor button pops up a screen with all of the installed fans, the primary temperatures and voltages. From here the user can also tweak the performance of the connected fans to his/her liking.
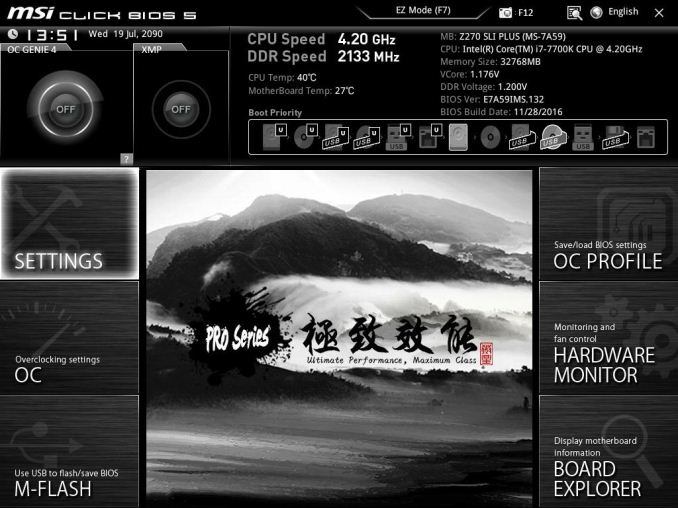
The “Advanced” mode can be used to reveal the entirety of the BIOS options. At first, the screen with the six large buttons looks very uncomplicated, but there are many settings that are mostly hidden into submenus.
The “Settings” submenu includes just five options. One of them is the simple “Save & Exit” option and the “System Status” option is almost entirely informative, with the system’s time and date being the only adjustable options here. The “Boot” and “Security” submenus are straightforward as well, with few options in each. However, the “Advanced” option brings up a whole list of other submenus, each for the control of individual features found on the motherboard. Some menus have only one or two sub-options, such as the “ACPI settings” menu that only offers the option to choose whether you would like the LED to be blinking or not. We can also notice the “Secure Erase+” option here, which is a feature we do not usually see in a BIOS. This practically is a “low level format” tool for SSDs that will effectively destroy all data of an attached SSD.
The OC button brings up all of the overclocking-related options. This includes frequency controls, timing controls, voltage settings, informative screens and CPU features options. Even on its “Simple” default setting, the number of options can be overwhelming for amateurs. The highly experienced and advanced user has to switch to the “Expert” mode for all of the options to become available. In a single long menu, we have a long list with the main CPU, DRAM, Voltage and other settings. Advanced options are accessible via submenus (the “>” sign denotes that the option will bring up a submenu).
The maximum system memory multiplier is 41.33 (4133 MHz). A submenu called “Advanced DRAM configuration” allows the user to tweak the timings of the DRAM modules. The vast majority of the users who will choose to tweak these options will stick to the six main timings, but MSI chose not to disappoint the professionals and inserted dozens of controls for DRAM sub-timings, turn-around timings, advanced timings and latency timings, as well as miscellaneous and on-die termination configuration options.
The “DigitALL Power” submenu offers access to the options of the digital CPU VRM, allowing the user to disable certain controls and protections. Regular users should leave all of these options enabled, but they might come in handy for professional overclockers and experts.
The “OC Profile” button is a simple menu that allows the users to save or load certain BIOS configurations. The BIOS supports up to six configurations but even more can be saved to USB devices. The “Hardware Monitor” remains unchanged from the EZ mode, offering the exact same number of options and features. Finally, the “Board Explorer” brings up an image of the motherboard and its rear I/O panel. The user can “explore” the board by simply moving the mouse around and details of the connected/attached device will be displayed where the pointer is. For example, if the mouse pointer is over a USB port, the BIOS will display which device is connected at this particular port.
Software
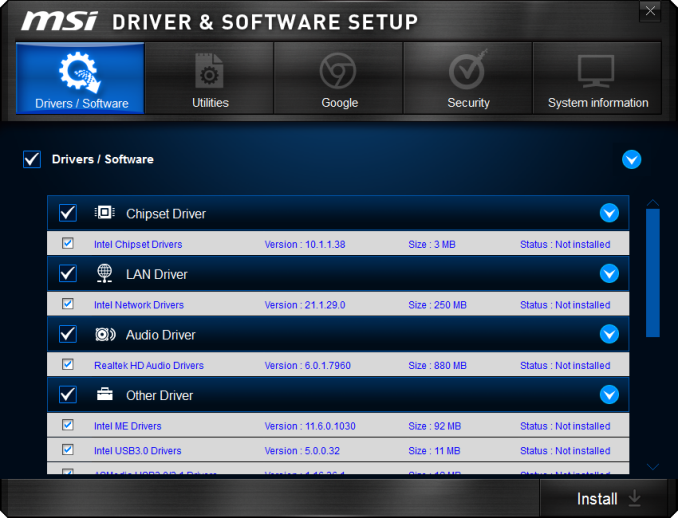
Unlike most vendors, MSI does not have an universal “App” that includes all of their software. Each and every application is a separate piece of software that can be installed or uninstalled individually. The launch screen of the supplied DVD offers five main options: Drivers, Utilities, Google, Security and System Information. The “Drivers” tab includes only the basic drivers that need to the installed for the motherboard’s devices to function properly. The “Google” tab only links to Google’s Chrome browser and the “Security” tab to a 60-day subscription of the Norton Security software. The “System Information” tab is purely informative and also includes the company’s contact information.
The “Utilities” tab includes software from MSI and others. Each piece of software can be individually installed or uninstalled. If, for example, you do not plan on using an RGB LED strip, there is no need to install the Mystic Light software at all.
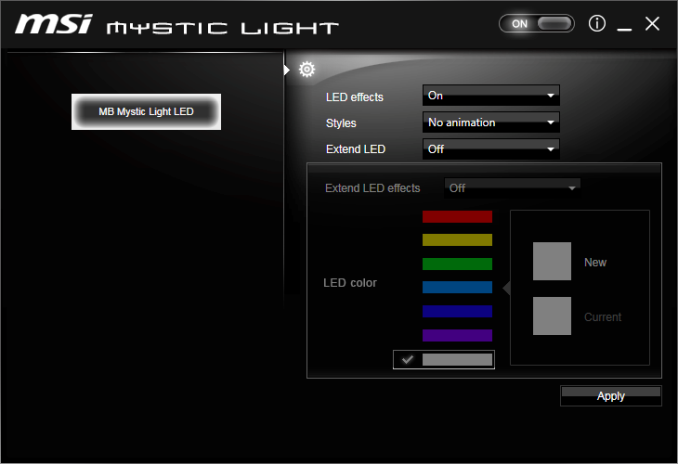
The Mystic Light software is very simple, allowing the user to change the strip’s color and/or have it perform simple visual effects, such as breathing or flashing. There is also a “random” lighting effect option that is definitely not for everyone.
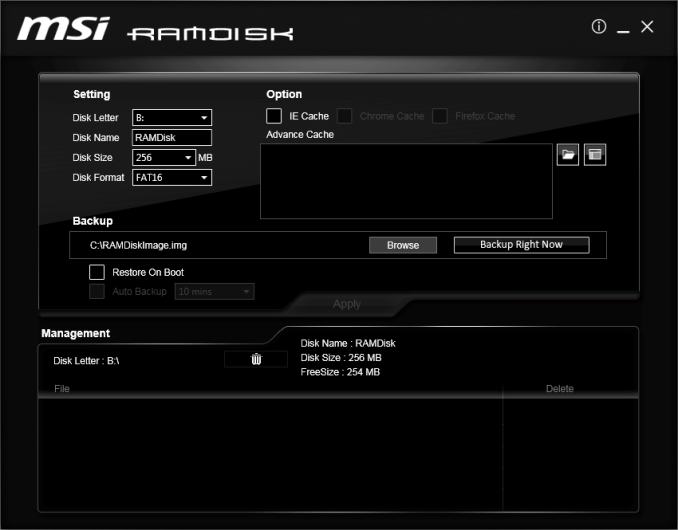
As its name suggests, the RAM Disk software can be used to easily create RAM Disks. Upon its installation, it will automatically generate a 256 MB RAM Disk. It offers the options to automatically transfer the cache of the most popular browsers to the RAM disk, allowing the browsers to become, in theory, significantly more responsive. Just be careful with sensitive data and RAM Disks; RAM Disks are temporary and data loss will be caused if something found on a RAM Disk was not backed up at the time of a forced system shutdown or freeze.
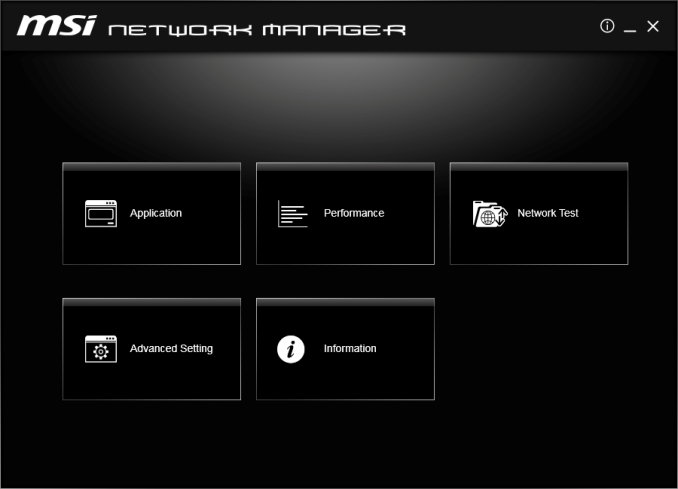
The MSI Network Manager offers basic control options for the Intel I219-V LAN controller. The Application tab allows for the bandwidth and priority control of individual applications and services. Applications can also be entirely blocked from accessing the network. The Performance tab is purely informative, with graphs showcasing the network’s usage, and the Network Test tab will perform a basic internet provider speed test towards an undefined host. The “Advanced Settings” tab includes an automatic RWIN expansion option and an IP-blocker. The IP-Blocker can be an especially useful feature for some, as it will block all traffic towards a provided list of IP addresses.
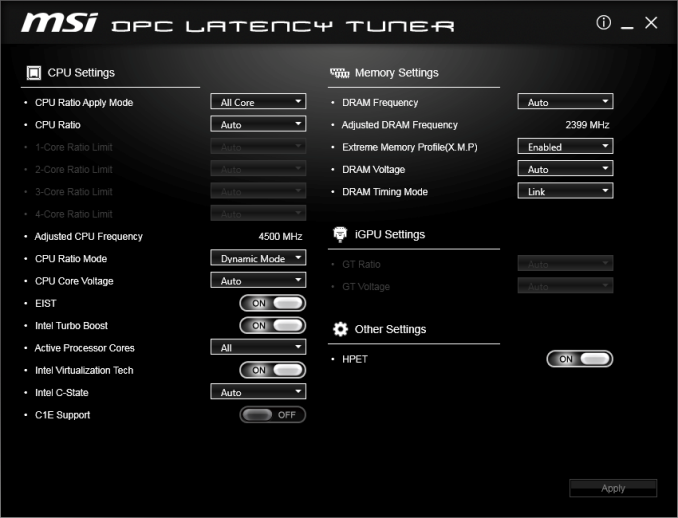
Oddly enough, the DPC Latency Tuner software mostly offers access to CPU and DRAM overclocking settings. The CPU’s ratio, voltage and main features are accessible, as are the DRAM’s frequency, voltage and timing controls. Although these options do affect the latency directly or indirectly, the DPC Latency Tuner is more of a simple and easy overclocking software than anything else.
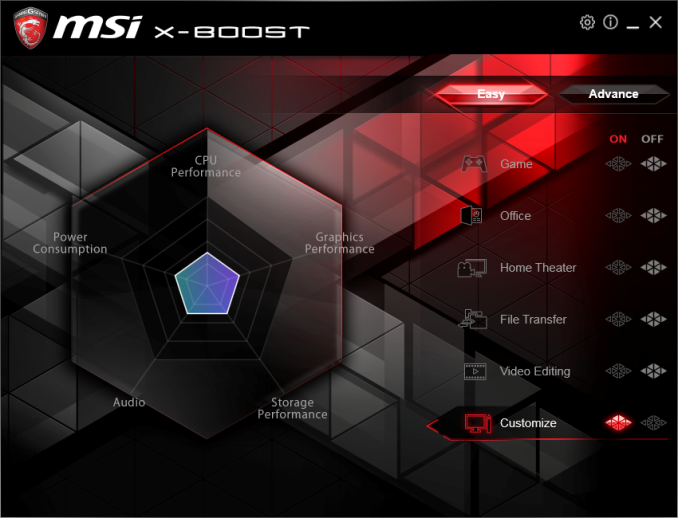
Finally, the MSI X-Boost is a vague software that can be used to “optimize” the system’s performance using predefined usage scenarios. These scenarios include “Game”, “Office”, “Home Theater”, “File Transfer” and “Video Editing”, as well as a custom mode. However, no matter what option is selected, there is no indication regarding the options/features that are being affected. The “Advance” screen is even more vague as it has even less options instead of more, allowing the users to “boost” the USB speed, the Storage speed and/or the VR speed. At this point we should mention that, during our testing, the USB 3.0 and 3.1 transfer speeds were unaffected by the status of the “USB Speed Up” option, as we already test with one CPU core already loaded.
ASRock Z270 Killer SLI Board Features
ASRock took a somewhat different approach than MSI, focusing their efforts mostly on the quality of the passive components and on aesthetics, implementing RGB lighting and a unique paint job. In order to keep the retail price of the motherboard low, ASRock made significant compromises, the most apparent of which are the omission of USB 3.1 (10 Gbps) ports and the use of the mediocre Realtek ALC892 codec. The company does focus their marketing efforts on the Nichicon Gold series capacitors that are being used on the audio circuit, but we will see if they can actually improve the performance of the lower-grade audio codec during our testing. Much like MSI’s offering, there are no native U.2 ports, but the use of U.2 drives is possible via appropriate adapters on the two M.2 slots. The Killer SLI also has a Thunderbolt AIC header (5-pin or 10-pin).
| ASRock Killer SLI | |
| Warranty Period | 3 Years |
| Product Page | Link |
| Price | $140 |
| Size | Flex-ATX |
| CPU Interface | LGA1151 |
| Chipset | Intel Z270 |
| Memory Slots (DDR4) | Four DDR4 Supporting 64GB Dual Channel Up to 4133 MHz |
| Memory Slots (DDR3L) | None |
| Video Outputs | HDMI 1.4 DVI-D |
| Network Connectivity | Intel I219-V |
| Onboard Audio | Realtek ALC892 |
| PCIe Slots for Graphics (from CPU) | 2 x PCIe 3.0 (x16, x8/x8) |
| PCIe Slots for Other (from PCH) | 4 x PCIe 3.0 x1 |
| Onboard SATA | Six, RAID 0/1/5/10 |
| Onboard SATA Express | None |
| Onboard M.2 | 2x PCIe 3.0 x4 or SATA, RAID 0/1, NVMe |
| Onboard U.2 | None |
| USB 3.1 | None |
| USB 3.0 | 5 x Rear Panel 2 via headers |
| USB 2.0 | 5 via headers |
| Power Connectors | 1 x 24-pin ATX 1 x 8-pin CPU |
| Fan Headers | 1 x CPU (4-pin) 1 x Pump (4-pin) 3 x CHA/SYS (4-pin) |
| IO Panel | 1 x Combination PS/2 5 x USB 3.0 Type-A 1 x USB 3.0 Type-C 1 x Optical SPDIF Out Port 1 x Network RJ-45 1 x HDMI 1.4 1 x DVI-D Port 1 x Audio Jacks |
| Other Features | COM Port Header TPM Header Front Audio Header RGB LED connector Thunderbolt connector |
Also compared to the MSI, ASRock has gone for additional PCIe 3.0 x1 slot, rather than a PCIe 3.0 x4.
In The Box
We get the following:
Driver Disk
Manual
Rear I/O Shield
Two black SATA cables (one straight, one with a 90° connector)
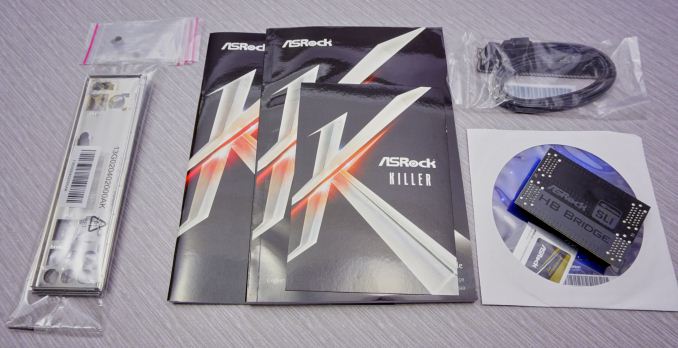
Case Badge
SLI Bridge
M.2 Slot Screws
The bundle of the ASRock Z270 Killer SLI is basic and straightforward, which was to be expected considering the price range of the motherboard. The supplied manual appears thick but that is because ASRock printed it in 13 languages, with the actual contents being very concise and lacking a lot of details. There is also a DVD with the drivers and other software, a typical I/O shield, a postcard, two black SATA cables, a case badge, an SLI bridge, and finally four little bags with a small M.2 screw in each. Why not a little bag with four screws in it but separate bags with a single screw in each? Perhaps ASRock wanted to reduce the chance of miscounted screws at the factory, we cannot think of any other reasonable explanation.
Visual Inspection
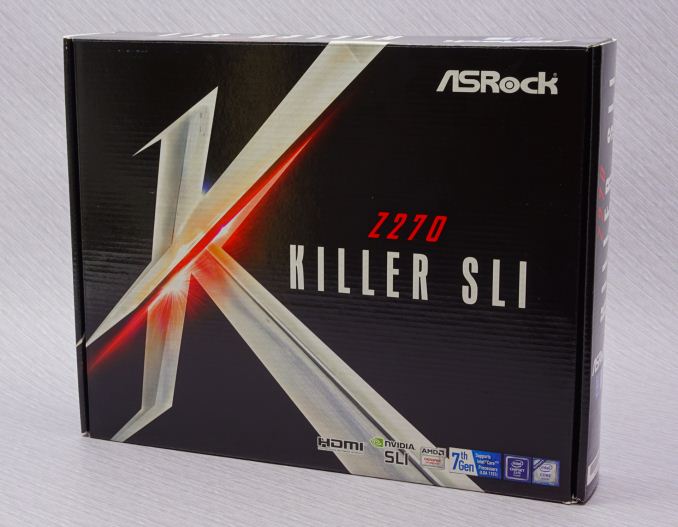
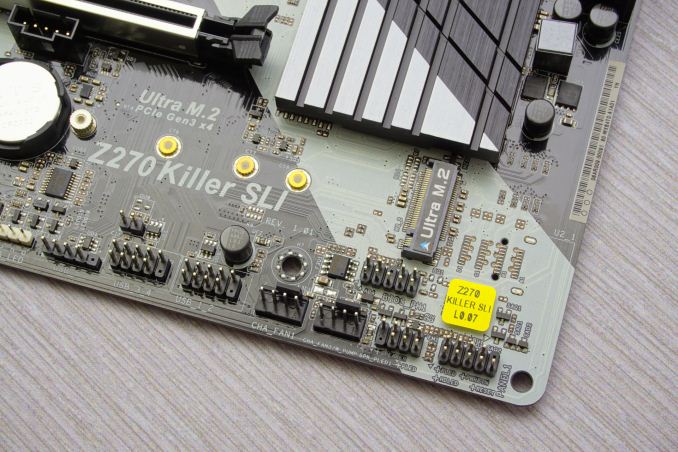
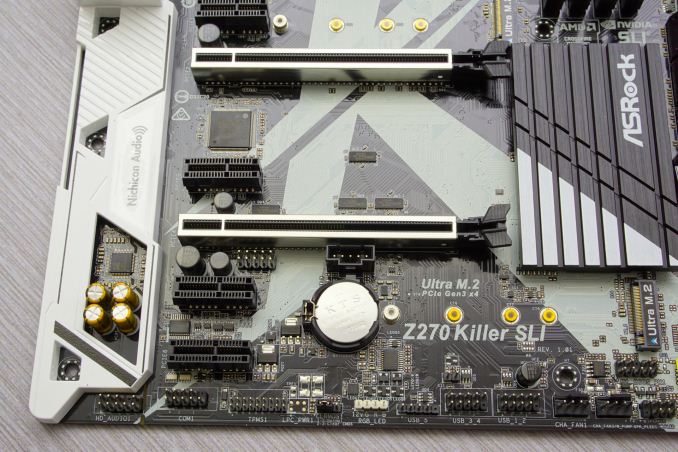
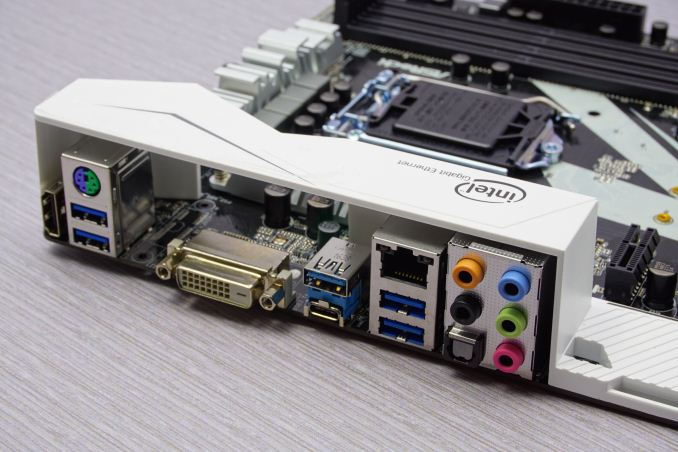
With the ASRock Killer SLI, the designer tried to combine a functional design with eye-catching aesthetics. It is a black and white design, with a huge white K printed on the glossy black PCB. The chipset heatsink has been partially sprayed white to match the overall design and the I/O protective cover is pure white. RGB LEDs are installed along the edges of the chipset heatsink and there is also a header for RGB LED strips. ASRock implemented metal “shielding” on the two PCIe 3.0 ×16 slots, but not on the RAM slots or other parts of the motherboard. As the purpose of these shields is to prevent the motherboard from flexing once very heavy cards are installed or if force is being used to lock a card/module into place, it is reasonable why ASRock installed shields only on the two PCIe 3.0 ×16 slots, where very heavy cards may be installed. The use of shielding on the DIMM slots suggests a tight gripping mechanism that requires force and the Killer SLI does not have that, with the single-side locking DIMM slots allowing the installation/removal of RAM modules with virtually no force at all.
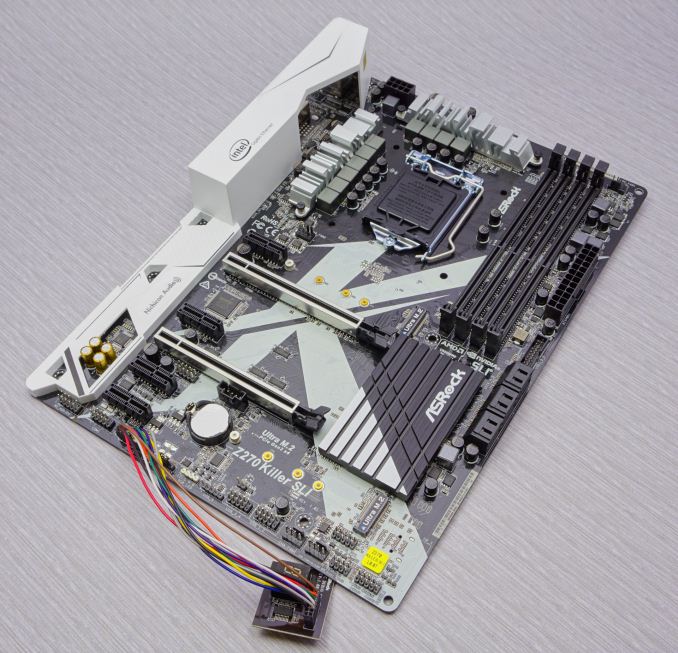
Our review sample came with an extra PCB with a debug, unlikely to be in retail samples
At this point we should also mention that the ASRock Z270 Killer SLI is not a true ATX motherboard but leans towards the Flex-ATX layout. It is a couple of centimeters narrower than an ATX board and will not reach the third column of screws inside a typical ATX case. Plastic offsets may be used on the holes at the right edges of the motherboard, but these are not meant for actual screws and will not meet any mounting points in most ATX case designs.
The general layout of the ASRock Z270 Killer SLI is very simple and straightforward. The designers placed almost all of the headers across the bottom edge of the motherboard, with the sole exception being one USB 3.0 ports header right below the ATX power connector that has been placed there for a corresponding front panel. One strange thing about this motherboard is that it has no debug display or debugging LEDs, yet our sample came with one attached on the TPS connector. We are unsure if ASRock is planning to offer these as extra parts for a fee, as they can be quite useful for some users.
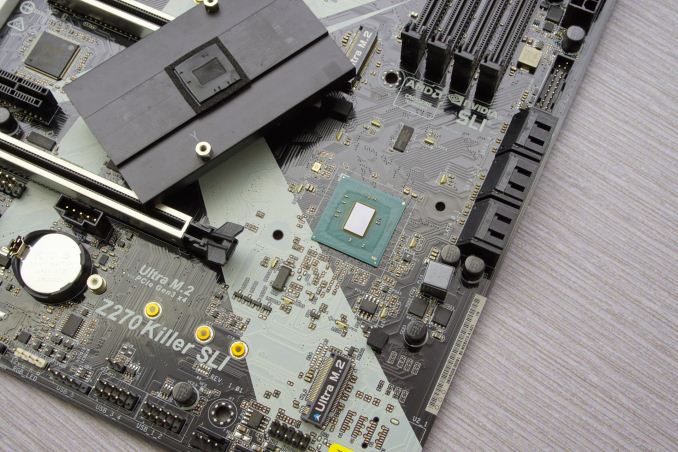
The space between the two PCIe ×16 slots is expanded, allowing the better cooling of the cards if two are simultaneously installed. Two 2280 M.2 slots are present, one above the first PCIe ×16 slot and one below the second PCIe ×16 slot. Much like with MSI’s offering, depending on the cooling parts that will be used, the top M.2 slot may be accessible with the system fully assembled, but the bottom M.2 slot will most definitely be blocked if a GPU card is installed on the second PCIe ×16 slot. The six SATA ports can be seen to the right side of the board and all have been placed facing rightwards.
We found four fan headers on the ASRock Killer SLI. The CPU fan header is oddly placed at the top right corner of the board. One of the two system fan headers is much closer to the CPU slot, right above the primary M.2 slot. The other two fan headers can be found at the bottom right corner of the motherboard, with one of them being for a system fan and the other supporting either a system fan or a liquid cooling pump. The bottom right corner of the board is a odd place to put a header for a pump; it will be very convenient for users that will use customized liquid cooling systems with their pumps on the case’s floor or front, but users with all-in-one liquid cooling systems may even be unable to reach the connector all the way from the CPU socket.
A quick glance at the rear of the ASRock Z270 Killer SLI reveals only one possible shortcoming, the complete absence of USB 2.0 ports. This will most likely not be an issue for most users as the USB 3.0 controller initializes and uses devices just fine in the BIOS and POST, but it may cause some compatibility problems with older hardware.
Other than that, we found everything that we were hoping to find on a sub-$140 motherboard. We can see a PS/2 combo port, one USB 3.0 Type-C and five USB 3.1 Type-A ports, a LAN port, an optical SPDIF out port and five 3.5 mm analog audio jacks. There also is a DVI-D port and one HDMI 1.4a port. Exactly like with the MSI motherboard, the HDMI port is limited to 30Hz @ 3840 × 2160 or 24Hz @ 4096 × 2160, making it impractical for driving 4K monitors, although it can be used for some casual movie watching on a 4K TV. Again, we believe that the practical purpose of having HDMI/DVI-D connectors on gaming motherboards is only to allow for the user to still have a usable system when the discrete GPU card(s) have been temporarily uninstalled, e.g. if damaged and being returned or between upgrades, or to drive a secondary monitor that will be used for simple tasks.
The chipset heatsink is making fairly good contact with the chipset’s core, with the used soft pad totally engulfing it while the heatsink is installed. The contact is excellent and the heatsink is more than adequate for the cooling needs of the efficient Z270 chipset, therefore we believe that the vast majority of the users who will buy this motherboard will not have to worry about ever removing it.
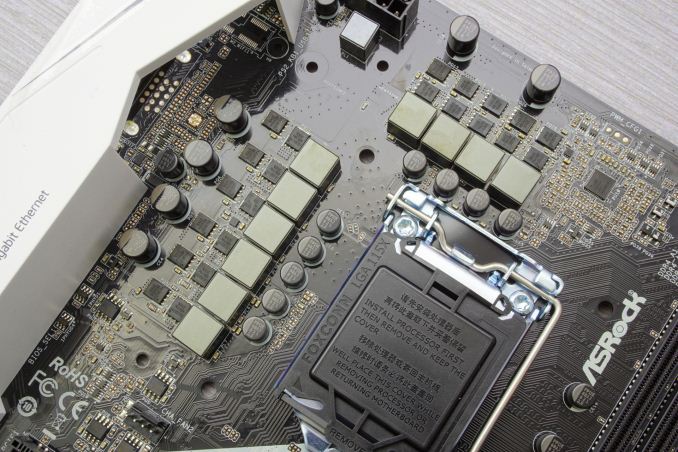
The quality of the passive components that ASRock has been using is exceptional. We can see Nichicon solid-state capacitors used all over the motherboard, including Gold series audio capacitors for the audio codec. The VRM circuit is an 8-phase design (6 + 2), with the phases distributed to the four different input voltages that the modern 1151 CPUs require (Core, I/O, Graphics and System). The main PWM controller is an Intersil ISL95824 four phase controller, with three out of the four phases feeding two MOSFETs simultaneously in order to generate a total of six phases. Niko Semiconductor MOSFETs are being used everywhere, including for the RAM modules. It is not an exceptional design we typically see for extreme overclocking, but it will definitely get the job done for casual overclockers and regular users.
BIOS
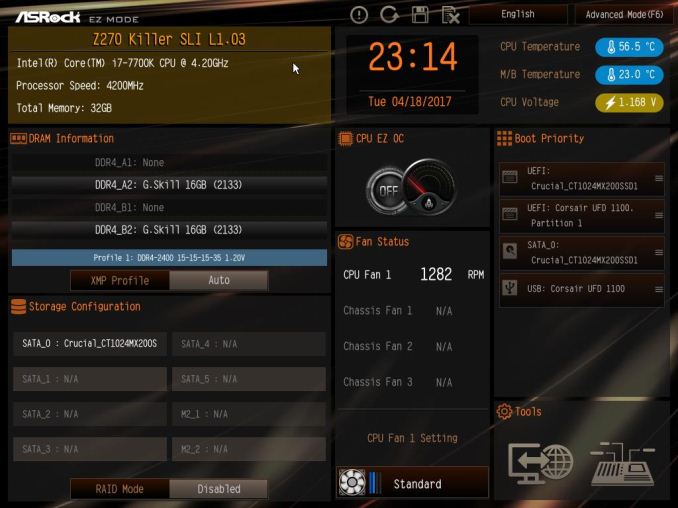
The ASRock Z270 Killer SLI features a graphical UEFI BIOS, much like every modern motherboard these days. The BIOS defaults to a simple, single page mode, called the “EZ Mode”. From this mode only basic features and functions are accessible, with most tabs being purely informative in function. The “Tools” Tab does bring up some interesting functions though. There is the “Instant Flash” option that allows the user to flash a BIOS available into a USB drive, but there is also an “Internet Flash” option that has the ASRock Z270 Killer SLI automatically connecting to the company’s servers, checking, downloading and flashing the latest stable BIOS instantly, without having to download it from inside an OS.
The “System Browser” tool is identical to MSI’s “Board Explorer”; it brings up an image of the motherboard and its rear I/O panel, where the user can “explore” the board with the mouse’s pointer. The tool will display information on the device that is attached/connected on the port or slot that the pointer is placed on. Finally, the “FAN-Tastic” tuning tool brings up a bright red screen that will try and burn the user’s retinas. Assuming that the user escaped blindness, the thermal profile of the cooling fans connected to the motherboard’s headers can be either selected from four pre-programmed presets or manually programmed.
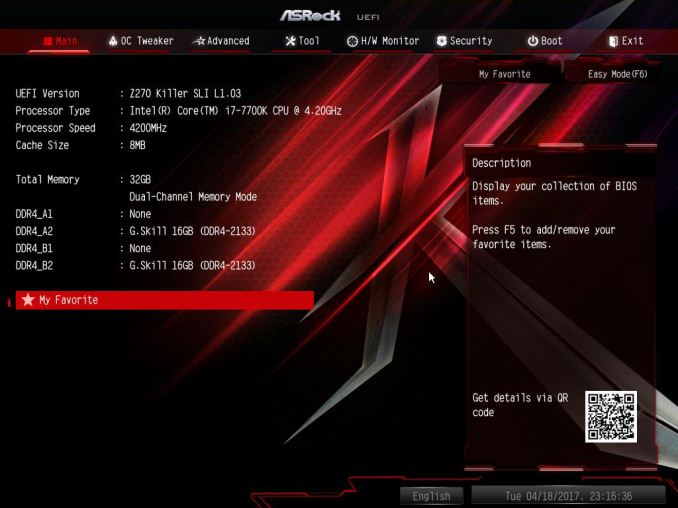
The Advanced BIOS mode brings out all of the motherboard’s options and features, cleanly organized under seven major tabs. The first tab is the “Main” Tab and only includes system information and a list of settings that have been flagged by the user as “Favorite”.
Naturally, the “OC Tweaker” tab includes the largest number of options and settings. For users that do not want to be bothered with extensive options, the company implemented the “Load Optimized CPU OC setting” option that will automatically overclock an unlocked CPU at the specified speed, offering options up to 500 MHz above the stock speed of the installed CPU. ASRock organized all of these settings into three submenus: one of the CPU settings, one for the DRAM settings and one for the Voltage settings.
The “CPU Configuration” submenu includes all of the CPU-related options, such as the multiplier, BCLK frequency, Intel-specific features and power limits.
The “DRAM Tweaker” begins with the XMP settings and basic RAM timings. As the user begins scrolling down, the menu expands to “primary”, “secondary”, “third”, “fourth” and “advanced” timings, offering a ridiculous number of possible timing adjustments that even seasoned overclockers will not be fiddling with.
Finally, the “Voltage Configuration” submenu allows for the manipulation of the CPU, DRAM, PCH and other voltage lines.
The “Advanced” tab includes all of the configuration options for the motherboard’s features and onboard devices. Once again there is a “CPU Configuration” submenu, with the options that ASRock probably assumed that they are not relevant for overclockers. Most of these options control features of the CPU, such as hyper threading and virtualization. Among these options lies the disabling of thermal throttling, which may be used by experienced overclockers but can be very dangerous.
The “Chipset Configuration” submenu includes advanced options for the chipset’s link speeds and iGPU, and allows the disabling of the onboard audio and LAN devices. The rest of the submenus are straightforward, with the “Storage Configuration” including the SATA and M.2 control options, the “Super I/O” the settings for the onboard COM port header, etc. There is nothing out of the ordinary in any of these submenus.
The “Tool” tab once again brings forward the tools that we previously saw in the EZ Mode, plus the “Aura RGB LED” tool. Once that option has been selected, another screen pops up with a chromatic wheel and an image of the motherboard. From this screen, the user can program the color and even basic visual effects of the onboard LEDs and of the optional RGB LED strip, if a strip has been installed. The color and effects of the chipset and of the strip can be programmed separately. Under the “Tool” tab there is also an option to contact the “UEFI Tech Service”, which is practically sends a direct message to ASRock’s customer support from inside the BIOS. Another interesting option is the Internet Setting under the “Network Configuration” submenu that allows the user to manually set up the system’s IP rather than having DHCP do it automatically.
The “H/W Monitor” tab appears to be purely informative at first. Scrolling down the page reveals the fan settings, allowing the user to choose pre-programmed or program new thermal profiles for the cooling fans connected on the motherboard’s headers.
Software
Inside the supplied DVD, ASRock includes the drivers and four software packages. These four packages are the App Shop, the Aura RGB LED control panel, the App Charger, the A-tuning software. There are also minor utilities, such as the Restart to UEFI utility that performs the single simple function of rebooting the system and automatically enters the BIOS instead of booting the OS.
However, ASRock’s DVD refused to even show us the launch screen into our Windows 7 based test system. Any attempt to manually launching the installer resulted to us receiving an error stating that “This utility is not for this platform”. Downloading and installing the App Shop manually worked but we received the exact same error when we tried to launch the application. We tested both x86 and x64 installations of the OS but ASRock’s software refused to work with Windows 7, even though the company states that it should be compatible. Therefore there is either a bug in the current versions of the software that prevents it from identifying the presence of ASRock’s motherboard in Windows 7 or ASRock silently dropped the support of the OS.
Nevertheless, the included software has been presented in detail in one of our previous reviews and, aside from the apparent incompatibility with Windows 7 installations, it does not appear to have any significant changes since then. For a detailed views on ASRock’s App Shop, A-Tuning, and other tools, please visit our review of the ASRock X99E-ITX/ac motherboard.
Test Bed and Setup
Readers of our motherboard review section will have noted the trend in modern motherboards to implement a form of MultiCore Enhancement / Acceleration / Turbo (read our report here) on their motherboards. This does several things, including better benchmark results at stock settings (not entirely needed if overclocking is an end-user goal) at the expense of heat and temperature. It also gives in essence an automatic overclock which may be against what the user wants. Our testing methodology is ‘out-of-the-box’, with the latest public BIOS installed and XMP enabled, and thus subject to the whims of this feature. It is ultimately up to the motherboard manufacturer to take this risk – and manufacturers taking risks in the setup is something they do on every product (think C-state settings, USB priority, DPC Latency / monitoring priority, overriding memory sub-timings at JEDEC). Processor speed change is part of that risk, and ultimately if no overclocking is planned, some motherboards will affect how fast that shiny new processor goes and can be an important factor in the system build.
For reference, both the MSI Z270 SLI Plus and the ASRock Z270 Killer SLI had multi-core acceleration enabled by default. We tested the MSI Z270 SLI Plus with the 1.4 BIOS and the ASRock Z270 Killer SLI with the 2.00 BIOS.
| Test Setup | |
| Processor | Intel Core i7-7700K (ES, Retail Stepping), 91W, $340 4 Cores, 8 Threads, 4.2 GHz (4.5 GHz Turbo) |
| Motherboards | MSI Z270 SLI Plus ASRock Z270 Killer SLI |
| Cooling | Alphacool Eisbaer 240 |
| Power Supply | Corsair AX1200i Platinum PSU |
| Memory | G.Skill DDR4-2400 C15 2x16 GB 1.2V |
| Memory Settings | XMP @ 2400 |
| Video Cards | MSI GTX 770 Lightning 2GB (1150/1202 Boost) |
| Hard Drive | Crucial MX200 1TB |
| Case | Open Test Bed |
| Operating System | Windows 7 64-bit SP1 |
Many thanks to Alphacool, Corsair, G.Skill, MSI and Crucial for contributing to our test bed.
System Performance
Not all motherboards are created equal. On the face of it, they should all perform the same and differ only in the functionality they provide - however this is not the case. The obvious pointers are power consumption, but also the ability for the manufacturer to optimize USB speed, audio quality (based on audio codec), POST time and latency. This can come down to manufacturing process and prowess, so these are tested.
Power Consumption
Power consumption was tested on the system while in a single MSI GTX 770 Lightning GPU configuration with a wall meter connected to the Corsair AX1200i power supply. This power supply is Platinum rated, and as I am on a 230-240 V supply, leads to ~75% efficiency > 50W, and 90%+ efficiency at 250W, suitable for both idle and multi-GPU loading. This method of power reading allows us to compare the power management of the UEFI and the board to supply components with power under load, and includes typical PSU losses due to efficiency. These are the real world values that consumers may expect from a typical system (minus the monitor) using this motherboard.
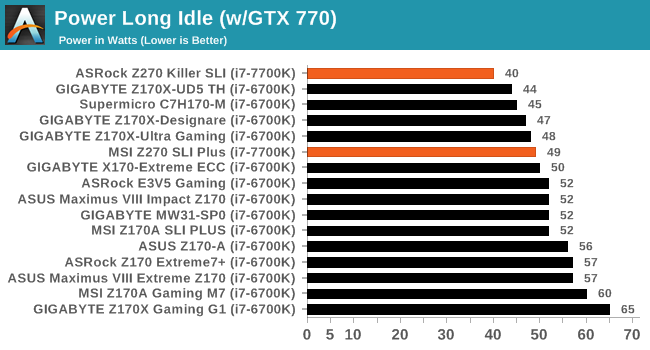
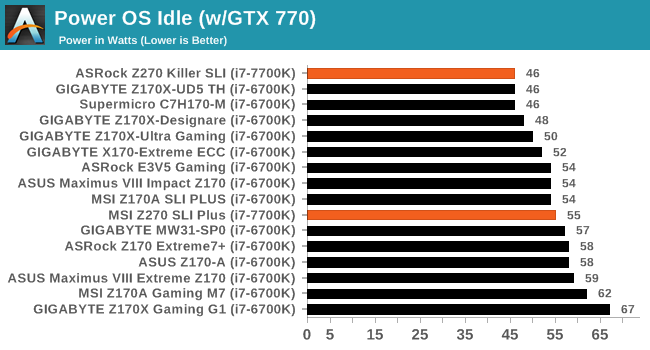
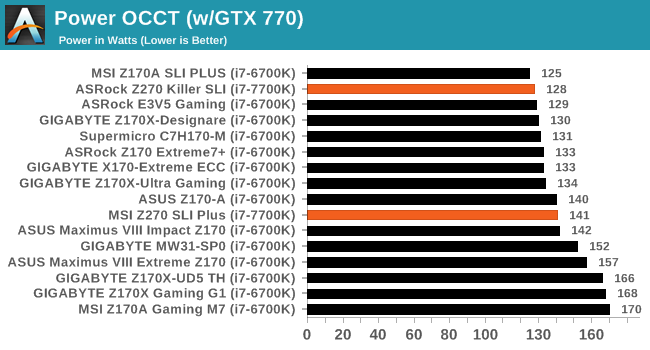
The consumption of the MSI Z270 SLI Plus is a bit on the high side considering the presence of the Intel i7-7700K CPU. The power consumption is comparable to that of Z170 boards with the i7-6700K CPU but we expected better figures than these. The ASRock Z270 Killer SLI fares significantly better, with the relative difference in terms of energy consumption when the system is idling being nearly 20%.
Non UEFI POST Time
Different motherboards have different POST sequences before an operating system is initialized. A lot of this is dependent on the board itself, and POST boot time is determined by the controllers on board (and the sequence of how those extras are organized). As part of our testing, we look at the POST Boot Time using a stopwatch. This is the time from pressing the ON button on the computer to when Windows 7 starts loading. (We discount Windows loading as it is highly variable given Windows specific features.)
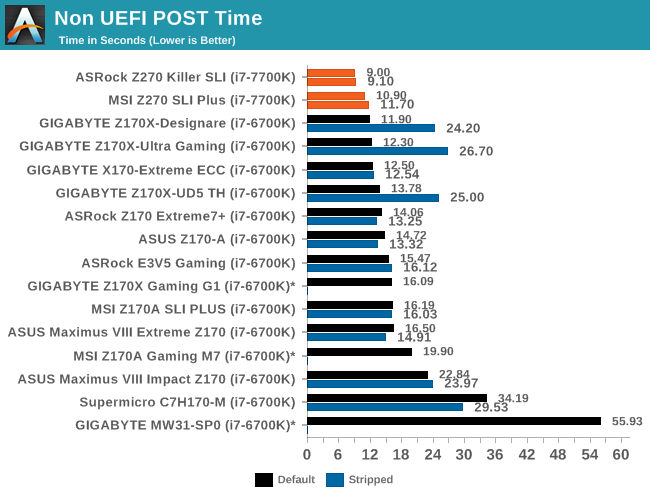
The default boot time of both motherboards is exceptional, with the ASRock Z270 Killer SLI landing a time under 10 seconds, making it the motherboard with the fastest boot time that we have tested to this date. The MSI Z270 SLI Plus falls nearly two seconds behind but the boot time of 11.7 seconds still remains excellent. The disabling of all onboard controller and enabling the “fast boot” options does very little to help the boot times of both motherboards.
Rightmark Audio Analyzer 6.2.5
Rightmark:AA indicates how well the sound system is built and isolated from electrical interference (either internally or externally). For this test we connect the Line Out to the Line In using a short six inch 3.5mm to 3.5mm high-quality jack, turn the OS speaker volume to 100%, and run the Rightmark default test suite at 192 kHz, 24-bit. The OS is tuned to 192 kHz/24-bit input and output, and the Line-In volume is adjusted until we have the best RMAA value in the mini-pretest. We look specifically at the Dynamic Range of the audio codec used on board, as well as the Total Harmonic Distortion + Noise.
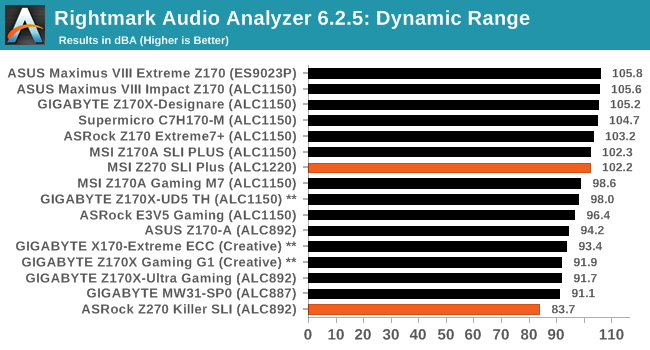
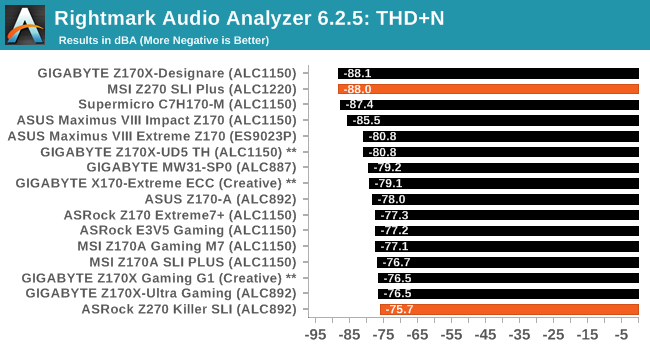
The two motherboard that we are testing today are worlds apart in terms of audio performance. MSI’s new Realtek ALC1220 codec delivers excellent performance figures, with the dynamic range reaching above 102 dB(A) and THD + Noise hitting -88 dB(A). On the other hand, the performance of the ALC892 codec on the ASRock Z270 Killer SLI is poor, even when compared to older boards that feature the same chipset. Even though it is lacking an optical SPDIF out port, the MSI Z270 SLI Plus is much superior than the ASRock Z270 Killer SLI in terms of audio performance.
USB Backup
For this benchmark, we transfer a set size of files from the SSD to the USB drive using DiskBench, which monitors the time taken to transfer. The files transferred are a 1.52 GB set of 2867 files across 320 folders – 95% of these files are small typical website files, and the rest (90% of the size) are small 30 second HD videos. In an update to pre-Z87 testing, we also run MaxCPU to load up one of the threads during the test which improves general performance up to 15% by causing all the internal pathways to run at full speed.
Due to the introduction of USB 3.1, as of June 2015 we are adjusting our test to use a dual mSATA USB 3.1 Type-C device which should be capable of saturating both USB 3.0 and USB 3.1 connections. We still use the same data set as before, but now use the new device. Results are shown as seconds taken to complete the data transfer.
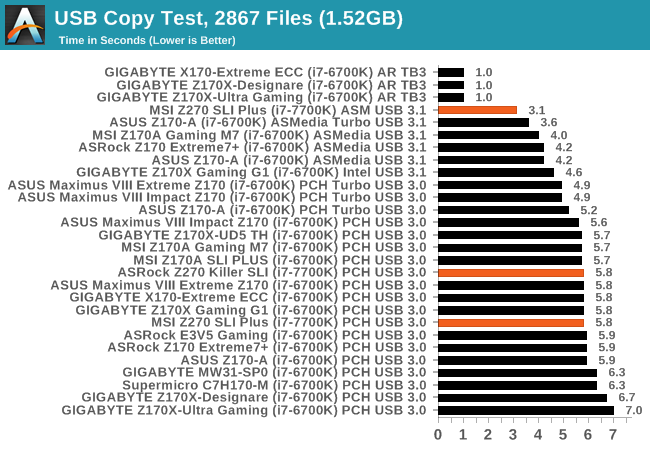
Naturally, the USB 3.1 controller present on the MSI Z270 SLI Plus gives it a great performance edge, reducing copy times down to 3.1 seconds. Using the USB 3.0 ports on the same board nearly doubles that time, with DiskBench reporting 5.8 seconds. The ASRock Z270 Killer SLI does not have any USB 3.1 ports and its USB 3.0 performance is identical to that of the MSI’s offering.
DPC Latency
Deferred Procedure Call latency is a way in which Windows handles interrupt servicing. In order to wait for a processor to acknowledge the request, the system will queue all interrupt requests by priority. Critical interrupts will be handled as soon as possible, whereas lesser priority requests such as audio will be further down the line. If the audio device requires data, it will have to wait until the request is processed before the buffer is filled.
If the device drivers of higher priority components in a system are poorly implemented, this can cause delays in request scheduling and process time. This can lead to an empty audio buffer and characteristic audible pauses, pops and clicks. The DPC latency checker measures how much time is taken processing DPCs from driver invocation. The lower the value will result in better audio transfer at smaller buffer sizes. Results are measured in microseconds.
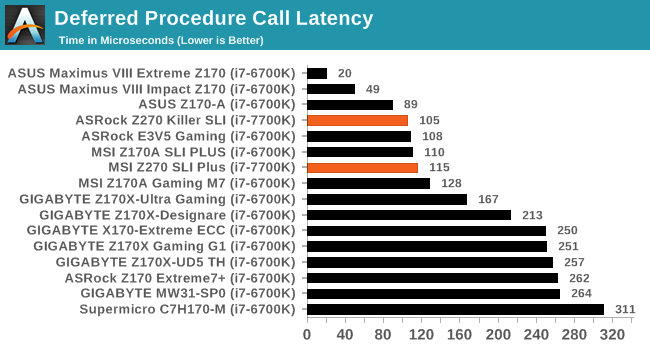
The DPC latency figures of both the MSI Z270 SLI Plus and the ASRock Z270 Killer SLI are excellent. The ASRock Z270 Killer SLI is slightly better, scoring a maximum latency of 105 μs. The MSI Z270 SLI Plus reported a maximum latency of 115 μs. Both of these figures are good for modern systems.
CPU Performance, Short Form
For our motherboard reviews, we use our short form testing method. These tests usually focus on if a motherboard is using MultiCore Turbo (the feature used to have maximum turbo on at all times, giving a frequency advantage), or if there are slight gains to be had from tweaking the firmware. We leave the BIOS settings at default and memory at JEDEC (DDR4-2133 C15) for these tests, making it very easy to see which motherboards have MCT enabled by default.
These results are using an i7-7700K, so will naturally be above i7-6700K results - as we test more Z270 motherboards we will continue forward with i7-7700K numbers.
Video Conversion – Handbrake v0.9.9: link
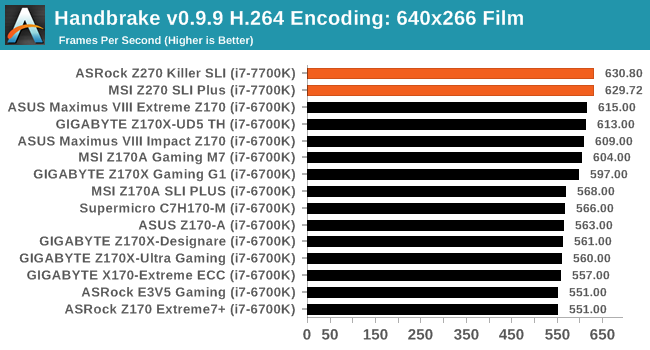
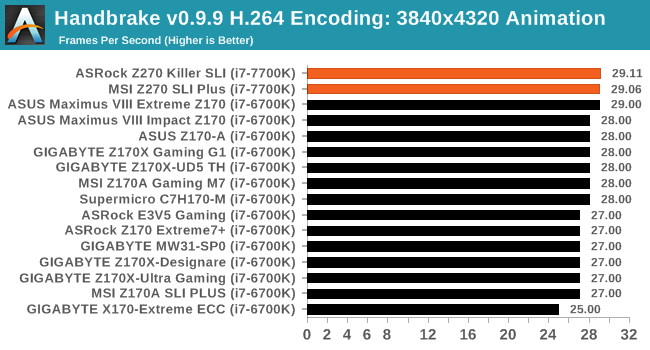
Handbrake is a media conversion tool that was initially designed to help DVD ISOs and Video CDs into more common video formats. For HandBrake, we take two videos (a 2h20 640x266 DVD rip and a 10min double UHD 3840x4320 animation short) and convert them to x264 format in an MP4 container. Results are given in terms of the frames per second processed, and HandBrake uses as many threads as possible.
Compression – WinRAR 5.0.1: link
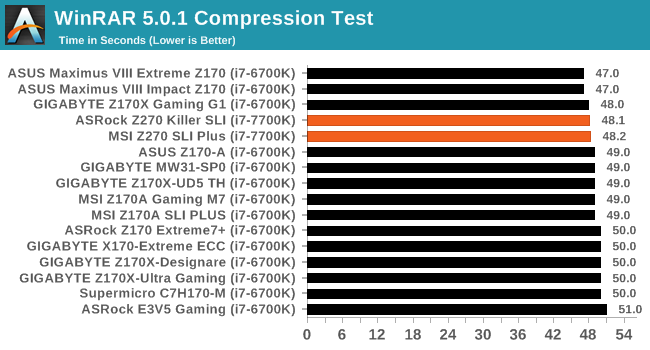
Our WinRAR test from 2013 is updated to the latest version of WinRAR at the start of 2014. We compress a set of 2867 files across 320 folders totaling 1.52 GB in size – 95% of these files are small typical website files, and the rest (90% of the size) are small 30 second 720p videos.
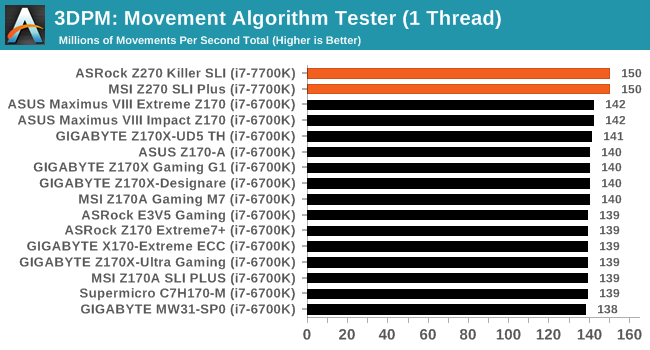
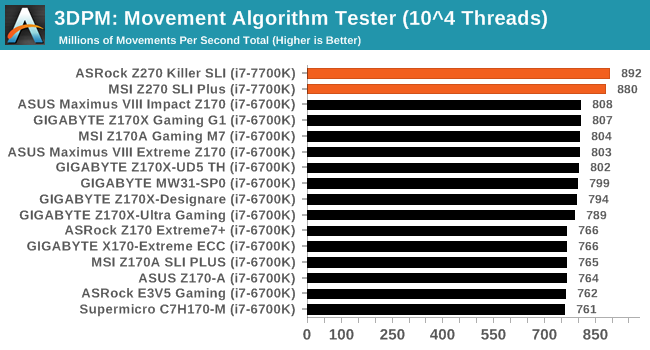
Point Calculations – 3D Movement Algorithm Test: link
3DPM is a self-penned benchmark, taking basic 3D movement algorithms used in Brownian Motion simulations and testing them for speed. High floating point performance, MHz and IPC wins in the single thread version, whereas the multithread version has to handle the threads and loves more cores. For a brief explanation of the platform agnostic coding behind this benchmark, see my forum post here.
Rendering – POV-Ray 3.7: link
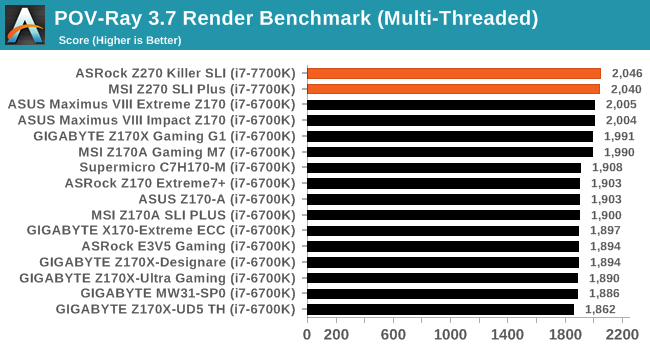
The Persistence of Vision Ray Tracer, or POV-Ray, is a freeware package for as the name suggests, ray tracing. It is a pure renderer, rather than modeling software, but the latest beta version contains a handy benchmark for stressing all processing threads on a platform. We have been using this test in motherboard reviews to test memory stability at various CPU speeds to good effect – if it passes the test, the IMC in the CPU is stable for a given CPU speed. As a CPU test, it runs for approximately 2-3 minutes on high end platforms.
Synthetic – 7-Zip 9.2: link
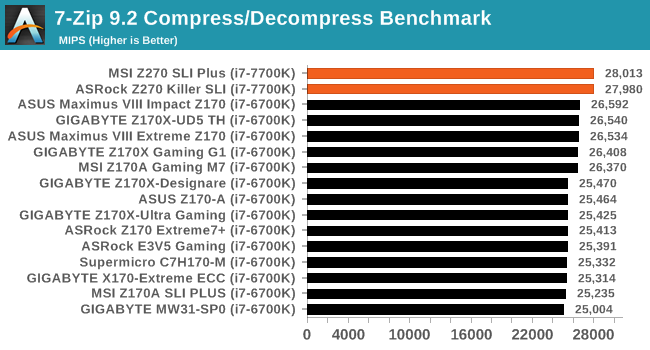
As an open source compression tool, 7-Zip is a popular tool for making sets of files easier to handle and transfer. The software offers up its own benchmark, to which we report the result.
Gaming Performance
The issue of FCLK settings might play a big role here. At launch, the default setting for the communication buffer between the CPU and PCIe stack was 800 MHz, even though Intel suggested 1000 MHz, but this was because of firmware limitations from Intel. Since then, there is firmware to enable 1000 MHz, and most motherboard manufacturers have this - but it is unclear if the motherboard will default to 1000 MHz and it might vary from BIOS version to BIOS version. As we test at default settings, our numbers are only ever snapshots in time, but it leads to some interesting differences in discrete GPU performance.
(A side note from Ian: This is one of E. Fylladitakis first motherboard reviews and we supplied him with a single GPU to get started. This may change in the future. But ultimately the gaming tests have been more of a checkbox for abnormal behaviour, as with the CPU tests, to make sure nothing fishy is going on.)
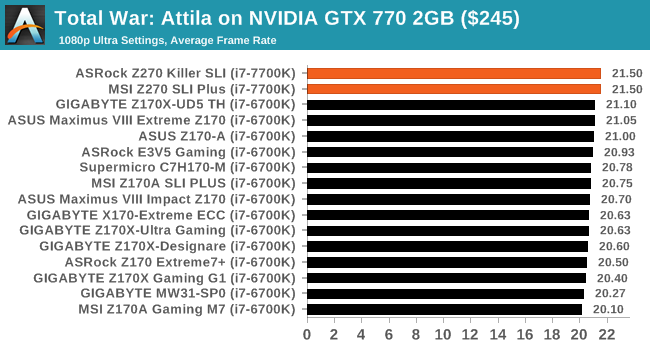
Total War: Attila
The Total War franchise moves on to Attila, another The Creative Assembly development, and is a stand-alone strategy title set in 395AD where the main story line lets the gamer take control of the leader of the Huns in order to conquer parts of the world. Graphically the game can render hundreds/thousands of units on screen at once, all with their individual actions and can put some of the big cards to task.
For low end graphics, we test at 720p with performance settings, recording the average frame rate. With mid and high range graphics, we test at 1080p with the quality setting. In both circumstances, unlimited video memory is enabled and the in-game scripted benchmark is used.
GRID: Autosport
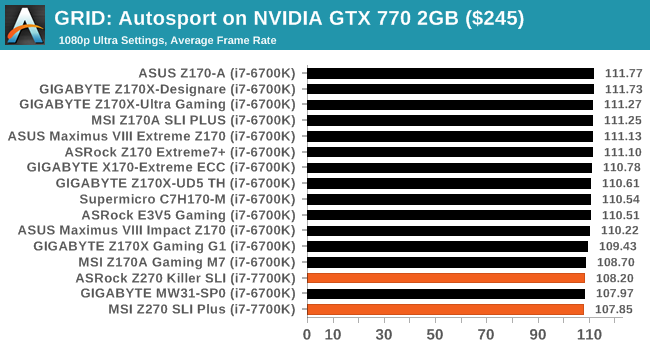
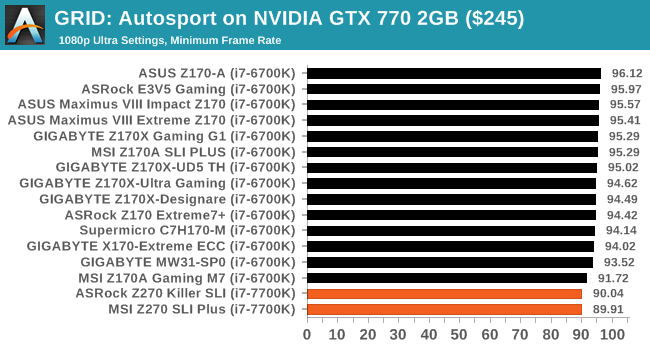
No graphics tests are complete without some input from Codemasters and the EGO engine, which means for this round of testing we point towards GRID: Autosport, the next iteration in the GRID and racing genre. As with our previous racing testing, each update to the engine aims to add in effects, reflections, detail and realism, with Codemasters making ‘authenticity’ a main focal point for this version.
GRID’s benchmark mode is very flexible, and as a result we created a test race using a shortened version of the Red Bull Ring with twelve cars doing two laps. The car is focus starts last and is quite fast, but usually finishes second or third. For low end graphics we test at 1080p medium settings, whereas mid and high end graphics get the full 1080p maximum. Both the average and minimum frame rates are recorded.
Conclusion
Both of the MSI Z270 SLI Plus and the ASRock Z270 Killer SLI are targeted towards the same market segment, that of entry and mainstream gamers. The approach that each manufacturer takes, however, is slightly different and each motherboard will appeal to a different group of users.
ASRock is placing a lot of effort on aesthetics, with the Z270 Killer SLI featuring onboard RGB lighting plus a header for RGB LED strips. The motherboard itself also sports a unique paint job, with a white huge “K” breaking the simplicity of the glossy black paint. MSI’s Z270 SLI Plus also has a header for RGB LED strips but the onboard LEDs are white, while the entire motherboard is black, with silver accents provided by the steel slot brace supports and on the heatsinks. The MSI Z270 SLI Plus is by no means bad looking but it definitely is not as flashy as the ASRock Z270 Killer SLI.
In terms of CPU and gaming performance, both of these motherboards are virtually equal. Any and all performance differences are minuscule and well within the small statistical error margin. When it comes to overall system performance however, the MSI Z270 SLI Plus is significantly superior on the controller front, with the much better audio codec delivering a better sound experience and the presence of the USB 3.1 controller significantly boosting file transfer times. ASRock does have an advantage in both the power consumption (due to the better quality of the power delivery) and the presence of the optical SPDIF out port, but users who do are indifferent about those are much more likely to be enticed by the better controllers found on MSI’s offering. The ASRock Z270 Killer SLI also has an onboard Thunderbolt header that could entice a small portion of users. On the other hand, the MSI Z270 SLI Plus can support a 22110 M.2 device and it has a third PCI-E ×16 slot, allowing more flexible storage device options. Other small differences include MSI using steel braces on the dual-side lock DIMM slots and a 10-phase VRM in comparison to the simple single-side DIMM slots and the 8-phase VRM of the ASRock Z270 Killer SLI, which arguably increases the overall quality of the design a little.
As far as similarities go, both motherboards have two PCI-E 3.0 ×4 M.2 slots and using SATA M.2 devices in these slots will always disable a SATA port on either board. The onboard network controller of both boards is the popular Intel I219-V and both have a COM port header. The MSI Z270 SLI Plus also has a parallel port header, quite possibly because the designer thought that some gamer might want to use a really old joystick for some retro gaming.
Considering that the CPU and gaming performance of both motherboards is the same, as is their current retail price tag, the MSI Z270 SLI Plus initially appears to be a reasonable choice. It has a much better audio codec, an USB 3.1 controller, can support 22110 M.2 devices, and has an extra PCI-E ×16 slot. However, it lacks Thunderbolt support and optical SPDIF out port, features that can instantly drive some users towards the ASRock Z270 Killer SLI. There is also the matter of aesthetics and beauty is in the eye of the beholder, so the RGB lighting and unique paint job of the ASRock Z270 Killer SLI can actually be more important to some users than USB 3.1 support and top-grade audio. Neither motherboard will disappoint with its performance but, considering their features, the MSI Z270 SLI Plus appears to have a better market potential at the moment of this review.

